
Introduction
WordPress is undoubtedly one of the most popular content management systems (CMS) in the world, powering millions of websites across the globe. Embarking on the journey of building a website with WordPress on your Linux server is an exciting endeavor. Its flexibility, ease of use, and extensive customization options make it a favorite among bloggers, businesses, and developers alike. If you’re considering setting up a WordPress site on your Linux server, you’re in the right place. In this comprehensive guide, we’ll walk you through the entire process of installing WordPress on a Linux-based server, covering everything from server setup to installation and configuration.

Part 1: Server Setup To Ready For WordPress Installation
Before diving into the installation process, you’ll need to ensure that your Linux server meets the necessary requirements and is properly configured. Here’s what you need to do:
Here is the installation guide for installing the wordpress – Click Here
- Choose Your Linux Distribution:
While WordPress can be installed on various Linux distributions, Ubuntu and CentOS are among the most commonly used ones. Choose the distribution that you’re most comfortable with or that aligns with your server’s requirements. - Set Up LAMP Stack (Linux, Apache, MySQL, PHP):
WordPress runs on a server equipped with a LAMP stack. If you haven’t already set it up, follow these steps:
Install Apache: Use your distribution’s package manager to install the Apache web server.
Install MySQL: Install the MySQL database server along with the required dependencies.
Installl PHP: Install PHP and its necessary modules for Apache to process PHP files.
You can follow the this for installing LAMP Stack. - Configure Virtual Host:
Set up a virtual host configuration for your site to ensure proper routing of web traffic. This involves creating a configuration file in Apache’s sites-available directory and enabling it.
Part 2: Database Setup
WordPress relies on a MySQL or MariaDB database to store website content, user information, and settings. Here’s how to set up a database for your installation:
- Create a MySQL Database and User:
Log in to your MySQL server using the command-line interface and execute SQL commands to create a new database and user for WordPress. Grant the user appropriate privileges to access and manage the database. - Secure MySQL Installation:
It’s crucial to secure your MySQL installation by setting a root password, removing anonymous users, and disallowing remote root login for enhanced security.
Part 3: WordPress Installation
Now that your server environment is properly configured and the database is set up, you’re ready to install WordPress. Follow these steps:

- Download:
Navigate to the official Website and download the latest version of WordPress. You can use wget or curl commands to download the package directly to your server.
Link -: https://wordpress.org/latest.zip OR Click Here - Extract Files:
Once the download is complete, extract the files to your web server’s document root directory. Ensure that the files are accessible by the web server. - Configure WordPress:
Rename the wp-config-sample.php file to wp-config.php and edit it to include your database connection details. You’ll need to provide the database name, username, password, and host. - Run Installation Script:
Open your web browser and navigate to your domain name or server’s IP address. You should see the installation wizard, where you’ll be prompted to provide basic information such as site title, admin username, password, and email address. - Complete Installation:
Once you’ve filled in the required information, click on the “Install WordPress” button. It will create the necessary tables in the database and set up your site. You’ll then be able to log in to the Admin Dashboard.
Part 4: Post-Installation Tasks
After installing WordPress, there are a few additional tasks you should perform to optimize your site and ensure smooth operation:
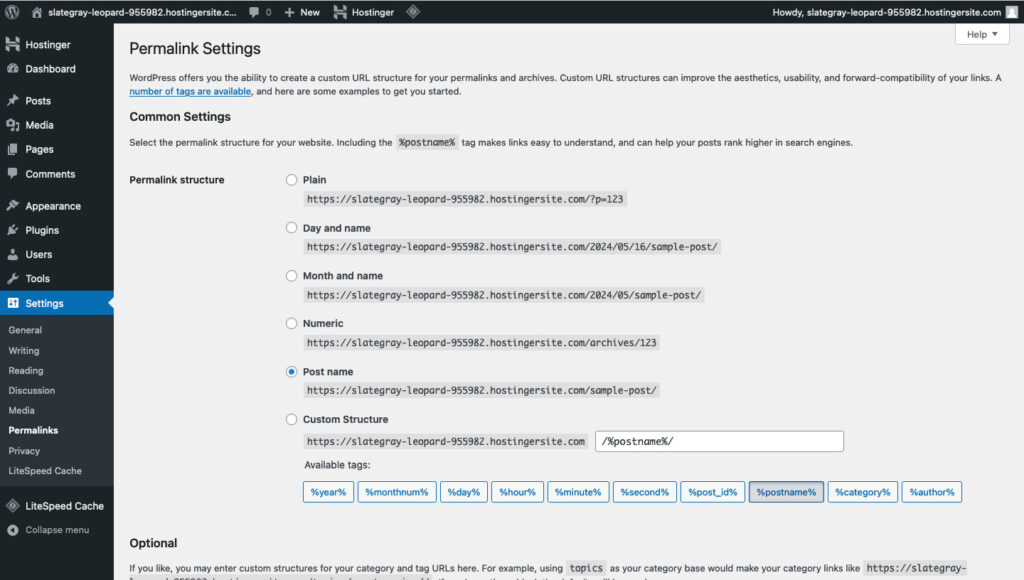
- Update Permalinks:
Configure your site’s permalink structure to make your URLs more user-friendly and SEO-friendly. You can choose from various permalink options or create a custom structure. - Install Essential Plugins:
Explore the Plugin directory and install essential plugins to enhance your site’s functionality and security. Popular plugins include Yoast SEO, W3 Total Cache, and Wordfence Security. - Set Up Theme and Customization:
Choose a WordPress theme that suits your site’s design and branding requirements. You can either use a free theme from the Theme directory or purchase a premium theme for additional features and customization options. - Configure Backup Solutions:
Implement a backup solution to regularly backup your site’s files and database. This ensures that you can restore your site in case of any data loss or server issues.
Conclusion
Congratulations! With WordPress successfully installed on your Linux server and your site taking shape, you’re now equipped to embark on an exciting journey of online presence building. By following this comprehensive guide, you’ve learned how to set up your server environment, configure the database, install WordPress, and perform post-installation tasks. Whether you’re building a personal blog, an e-commerce site, or a corporate website, It provides the flexibility and scalability you need to bring your ideas to life. Start exploring WordPress’s vast ecosystem of themes, plugins, and customization options to create a unique online presence that stands out from the crowd. Happy blogging!