The basic thing which we need to learn when we are entering into the server/hosting technology are called as LAMP Stack. We are happy to guide you through the installation of a LAMP stack. For Latest Updates You can subscribe our Blog. You may visit our blogs for Basic Linux Commands and Basic things about Linux System.
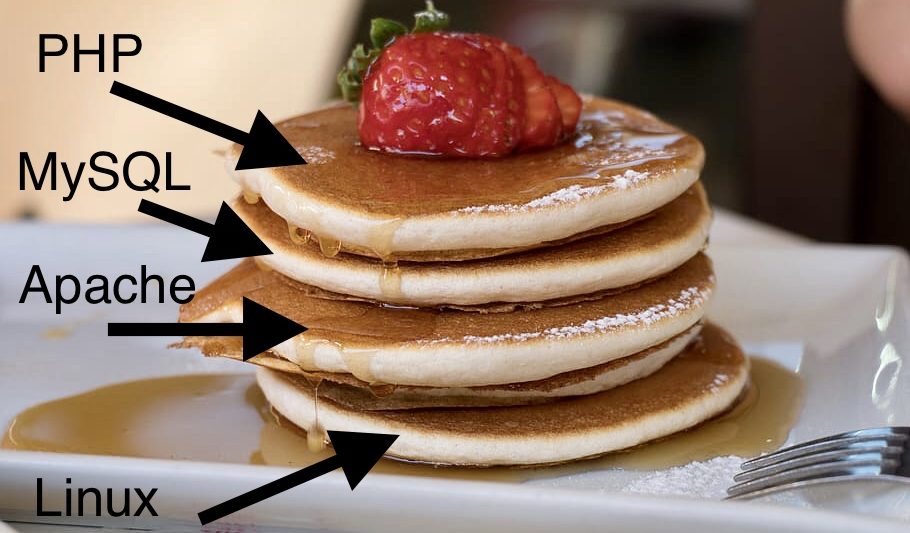
The LAMP Stack consists of four major components: Linux, Apache, MySQL, and PHP. It’s a popular web development environment used to host dynamic websites and web applications. In this guide, I’ll walk you through the installation process step by step. Please note that the specific commands and steps may vary depending on your Linux distribution.
Index for this Guide
Step 1: Install Linux (LAMP Stack)
Step 1(a): Install Linux (Ubuntu as an example)
- Download the Ubuntu Server ISO from the official website.
- Create a bootable USB drive with the ISO using a tool like Rufus or Etcher.
- Boot your computer from the USB drive and follow the installation prompts.
- During installation, select the “OpenSSH Server” option so you can remotely manage your server.
Step 2(b): Update and Upgrade
Now you are ready with the fresh and blank server. In most of the cases, firstly, we need to updates the packages for keep the system with Up-To-Date Packages/Software. For this we need to update and upgrade the packages/software.
After installing Ubuntu, connect to your server via SSH and update the package list and upgrade existing packages:

Here we have completed the First Step means installation of Linux(L) into the machine. Now we will move forward to the next element (Apache) installation from the LAMP Stack.
Step 2: Install Apache (LAMP Stack)
Apache is the widely used Web-server across the Globe. There is other types are also present like Nginx, Tomcat, IIS (Microsoft Windows). Here we are moving forword with the Apache Webserver for the same. We are installing the apache and starting the apache service to serve the web content on the web. Also we are enabling the apache service, so after reboot of machine, service will start at the bootup process.
Install Apache using the following command:

Start the Apache service:

Enable Apache to start on boot:

Here we have completed the Second Step means installation of Apache(A) into the machine. Now we will move forward to the next element (MySQL) installation from the LAMP Stack.
Step 3: Install MySQL (LAMP Stack)
MySQL is a popular open-source relational database management system. It’s often used in conjunction with other components, such as the Apache web server and PHP, to create dynamic web applications. Here are some basic details about MySQL.
What is MySQL?
MySQL is a powerful and widely used relational database system. It stores data in tables with predefined schemas and supports SQL (Structured Query Language) for querying and manipulating data.
Features
- Supports various storage engines, each with its own characteristics and optimizations (InnoDB, MyISAM, etc.).
- Provides ACID (Atomicity, Consistency, Isolation, Durability) compliance to ensure data integrity.
- Supports indexes for efficient data retrieval and querying.
- Offers user authentication and access control to secure data.
- Allows for data replication, clustering, and high availability setups.
Key Concepts
- Database: A container for storing related tables and data.
- Table: A structured collection of data with defined columns and data types.
- Column: A data field within a table, specifying the type of data it can hold.
- Row (or Record): A single entry in a table, representing a set of related data.
- Primary Key: A unique identifier for each row in a table.
- Foreign Key: A column that establishes a link between two tables, enforcing referential integrity.
- SQL: Structured Query Language used to create, manipulate, and query databases.
MySQL Client Tools
- mysql: The command-line tool for interacting with MySQL databases using SQL commands.
- phpMyAdmin: A web-based graphical interface for managing MySQL databases.
- MySQL Workbench: A visual tool for designing, developing, and administering MySQL databases.
Basic MySQL Commands
- CREATE DATABASE: Creates a new database.
- USE database_name: Specifies the database to be used.
- CREATE TABLE: Creates a new table within the current database.
- INSERT INTO: Adds new rows (records) into a table.
- SELECT: Retrieves data from one or more tables based on specified conditions.
- UPDATE: Modifies existing data in a table.
- DELETE: Removes rows from a table based on specified conditions.
Connecting to MySQL
You can connect to MySQL using various client tools or libraries, including the MySQL command-line client, programming languages like PHP or Python, or through graphical interfaces.
Security
It’s important to secure your MySQL installation. Set strong passwords for users, restrict access, and regularly update the MySQL server to fix security vulnerabilities.
Resources
- MySQL Documentation: Official MySQL documentation.
- MySQL Tutorial: Comprehensive MySQL tutorial for beginners.
- W3Schools MySQL Tutorial: Interactive tutorial with examples.
- MySQL Certification: MySQL certification programs.
Install MySQL Server and secure it:

During the MySQL installation, you’ll be prompted to set the root password and answer some security-related questions.
Here we have completed the Third Step means installation of MySQL(M) into the machine. Now we will move forward to the next element (PHP) installation from the LAMP Stack.
Step 4: Install PHP (LAMP Stack)
PHP is a widely-used scripting language primarily used for web development. It’s especially well-suited for creating dynamic web pages and web applications. Here are some basic details about PHP.
1. What is PHP?
PHP stands for “PHP: Hypertext Preprocessor.” It’s an open-source scripting language designed for server-side web development. PHP scripts are executed on the server, generating dynamic content that is then sent to the client’s web browser.
2. Features:
- Server-side Scripting: PHP scripts are executed on the server before being sent to the client’s browser. This allows for dynamic content generation.
- Embeddable: PHP code can be embedded within HTML, making it easy to mix dynamic and static content.
- Extensive Library Support: PHP has a vast collection of built-in functions and libraries for various tasks, such as file handling, database access, and more.
- Cross-platform: PHP is available on multiple platforms, making it versatile for various server environments.
- Open Source: PHP is open-source software, which means its source code is freely available for modification and redistribution.
3. Basic Syntax:
PHP code is enclosed within <?php and ?> tags. For example:
<?php
    echo "Hello, PHP!";
?>
4. Variables:
Variables in PHP start with the $ symbol followed by the variable name. PHP is loosely typed, meaning you don’t need to declare variable types explicitly.
$name = "John";
$age = 25;
5. Data Types:
PHP supports various data types, including strings, integers, floats, booleans, arrays, and more.
6. Conditional Statements:
PHP supports standard control structures like if statements, else statements, and loops (for, while, foreach).
if ($age < 18) {
    echo "You are a minor.";
} else {
    echo "You are an adult.";
}
7. Functions:
Functions in PHP allow you to group code into reusable blocks. PHP has numerous built-in functions and you can also create your own.
function greet($name) {
    return "Hello, " . $name . "!";
}

echo greet("Alice"); // Outputs: Hello, Alice!
8. Database Interaction:
PHP can interact with databases like MySQL to store and retrieve data from web applications. Common libraries for this purpose include MySQLi and PDO.
9. Web Development:
PHP is frequently used for server-side scripting in web development. It generates dynamic content, processes forms, and interacts with databases.
10. Resources:
- PHP Official Website: The official PHP website with documentation, downloads, and community resources.
- PHP Manual: Comprehensive documentation for PHP functions and features.
- W3Schools PHP Tutorial: Interactive tutorial for learning PHP.
- PHP: The Right Way: A guide to modern PHP best practices.
PHP is an essential tool for web developers, and its versatility and wide adoption make it a great language to learn for building dynamic and interactive web applications.
Install PHP and some commonly used modules:

Verify that PHP is working by creating a test PHP file:

Add the following content to the file:
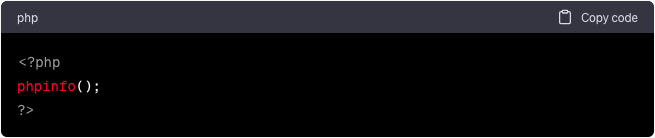
Save the file and exit the text editor.
Open a web browser and navigate to: http://your_server_ip/phpinfo.php. You should see a page displaying PHP information.
Here we have completed the Last Step means installation of PHP(P) into the machine. Now we will move forward to the configure the virtual host for the LAMP Stack.
Step 5: Configure Virtual Hosts
A virtual host (vHost) is a feature commonly used in web server software, like Apache, to host multiple websites on a single physical server. Virtual hosting allows you to run multiple websites with different domain names or IP addresses on the same server, sharing the same physical resources like CPU, memory, and storage, while keeping the websites isolated from each other.
Here’s how it works:
When a user enters a URL in their browser or clicks on a link, their browser sends a request to the web server. The web server needs to determine which website’s content to serve in response to this request. This is where virtual hosting comes into play.
Types of Virtual Hosting
There are two main types of virtual hosting:
- Name-based Virtual Hosting: In this setup, the web server distinguishes between websites based on the domain name specified in the HTTP request’s
Hostheader. This is the most common form of virtual hosting and is used when multiple websites share the same IP address. - IP-based Virtual Hosting: In this setup, each website has a unique IP address assigned to it. The web server uses the IP address to determine which website’s content to serve.
Virtual Host Configuration
In the context of the Apache web server, the virtual host configuration involves creating separate configuration files for each virtual host. Each configuration file specifies the settings for a specific website, including its domain name, document root (where the website’s files are stored), and other configuration directives.
Here’s a simplified example of a virtual host configuration in Apache:
<VirtualHost *:80>
    ServerName www.example.com
    DocumentRoot /var/www/example
    ErrorLog ${APACHE_LOG_DIR}/error.log
    CustomLog ${APACHE_LOG_DIR}/access.log combined
</VirtualHost>
In this example, requests to www.example.com would be directed to the /var/www/example directory on the server.
Benefits of Virtual Hosting
- Resource Efficiency: Virtual hosting allows multiple websites to share the same server resources, reducing hardware and operational costs.
- Isolation: Each website is isolated from the others, meaning issues on one website are less likely to affect others.
- Scalability: It’s easier to add or remove websites without affecting the others.
- Flexibility: You can host websites with different configurations and technologies on the same server.
Drawbacks
- Resource Sharing: If one website experiences a surge in traffic, it could potentially impact the performance of other websites sharing the same server.
- Security: A security breach in one website could potentially affect other websites if not properly isolated.
Virtual hosting is a crucial feature for maximizing the efficiency and utilization of server resources while allowing web developers and businesses to manage multiple websites from a single server.
Application Of LAMP Stack
If you plan to host multiple websites on your server, you should set up virtual hosts to manage them separately. Here’s a basic example:
Create a directory for your website’s files

Create a virtual host configuration file:

Add the following configuration (replace example details with your own):

Enable the virtual host and restart Apache:

Conclusion
That’s it! You’ve successfully installed a LAMP stack on your Linux server. You now have a basic web development environment to host and develop web applications. Remember to keep your system updated and secure by regularly applying updates and following best security practices.